The Sprite Animation component is for creating animated sequences from a sprite sheet or texture page. It is used in conjunction with an Image component, which specifies the source sprite sheet.
To create a sprite animation, drag a sprite sheet into the scene, then choose Add > Sprite Animation to insert a Sprite Animation component.
Setting up an animated sprite is a two-stage operation. First, the sprite sheet needs to be cut up into individual sprites. After that, sprites can be arranged into sequences to create animation clips. Both operations happen in the Sprite Animation Tool, which opens from the Edit Clips… button at the bottom of the Sprite Animation component. Once a clip exists, the Control Animation action can play it, pause it, or jump to a particular frame.
Pro Tip
Aseprite files are also supported by the Sprite Animation component. Dragging a .aseprite file into the scene will create an object with an image component, a sprite animation component, and all of the non-hidden Aseprite sequences it contains. You can still use the Sprite Animation Tool (see below) to adjust sequences, add new ones, etc.
The Sprite Animation Tool
The tool has two tabs. Sprites is where the sprite sheet is cut up into individual sprites. Animate is where those sprites are arranged into clips.
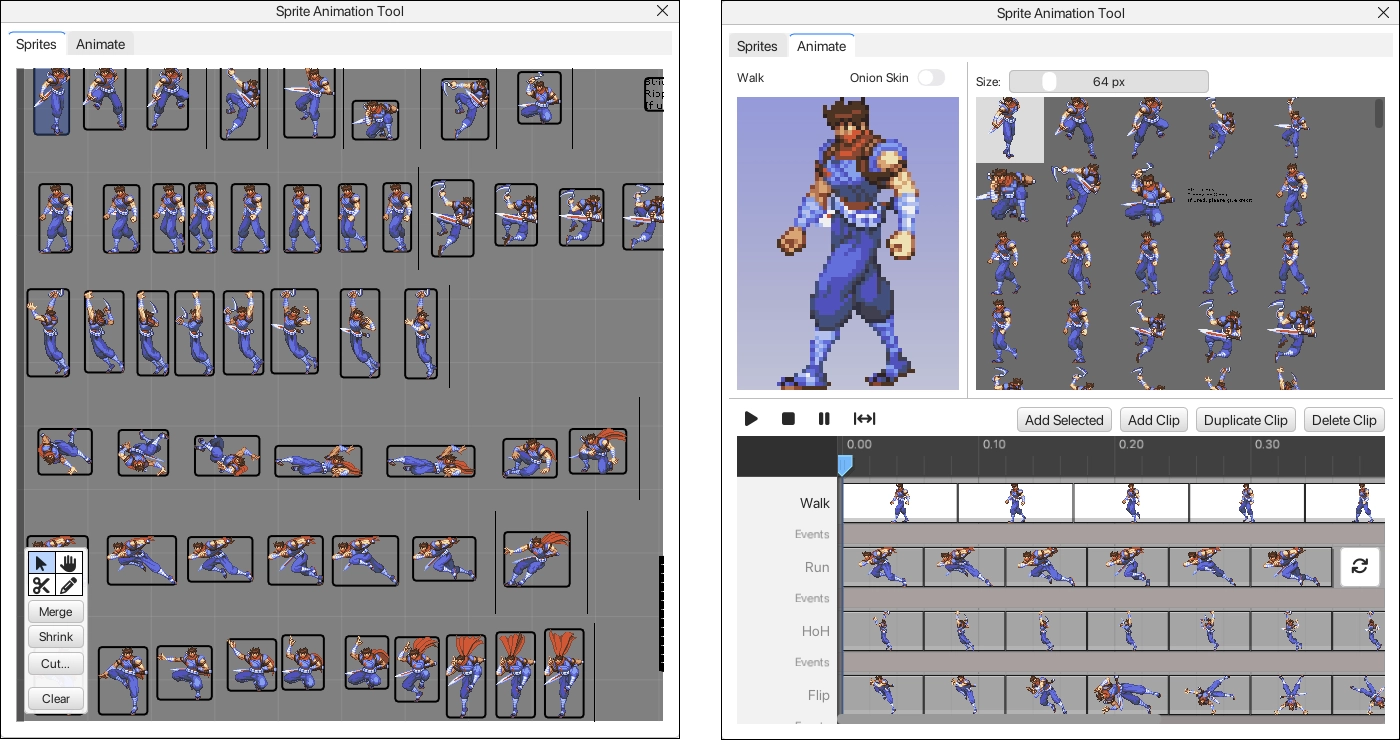
Sprites
Story Machine will attempt to automatically compute the bounding boxes of all the sprites in the sheet. If it gets it wrong, or if your sprites are arranged in a uniform grid, you can manually adjust rectangles around the sprites in the sheet to make them accurate. The Sprites tab lets you do this with several controls.
Basic manipulation tools:
- Select - Sprite rectangles can be selected with this tool.
- Drag - Pan the canvas.
- Split - The Split tool allows you to slice a sprite horizontally or vertically. For example, if a sprite rectangle covers two sprites instead of one, you can use this tool to split them into two. Hold Shift to toggle between vertical splitting and horizontal splitting.
- Draw - Drag out a new sprite rectangle by hand.
Below the tools:
- Merge - Combine the selected sprites into one rectangle large enough to hold them all.
- Shrink - Tighten each selected sprite so that it fits its own pixels exactly, discarding any surrounding transparency.
- Cut… - Recompute the sprite rectangles on the sheet (“cut out” the sprites). Automatic attempts to locate sprites by looking for transparent pixels between sprite images. If your sheet is arranged in a uniform grid, the Fixed Size option lets you specify the size of each cell, and cuts them out accordingly.
- Clear - Discard all the sprite rectangles on the sheet.
Animate
Once the sprites have been cut out of their sheet, they can be arranged into animated clips in the Animate tab.
The Animate tab contains a Preview, a Sprite Library, and a Timeline.
The Sprite Library lists every sprite cut from the sheet. Drag sprites from it onto the timeline to add them to a clip. You can create a new clip by dragging one ore more sprites into an empty area of the timeline.
The Timeline shows the clip sequences. Clips are made up of a series of frames, and each frame has a duration. You can resize individual frames to change their duration, or right-click on a frame to specify a length. Right clicking on a frame also allows you to apply the duration of that frame to all the others in a sequence. Frames can be dragged around in the sequence to reorder them.
Clips can be renamed by double clicking the clip name on the left side of the timeline. The icon on the right side of the timeline specifies looping for the animation.
- Add Clip makes a new, empty clip.
- Duplicate Clip duplicates the currently selected clip.
- Add Selected appends the sprites selected in the Sprite Library tab to the current clip. You can also drag sprites directly into an existing clip to insert them.
The Preview plays the current clip. Turning on Onion Skin draws every frame of the clip at once, faintly. You can also select an individual frame and use the mouse to adjust its position in the preview window to line it up with other frames in the animation.
Events
An event fires a trigger at a moment within a clip. For example, a run animation might have a trigger that plays a footstep sound every time a character’s feet touch the ground. Double-clicking the event row beneath a clip’s frames creates a new event.
Events have several properties:
- Type - Trigger fires a trigger event on the target object, running any Event Receiver set to Trigger. Named Trigger runs one particular action out of the target’s Action Library by name. See the Send Trigger action for details about triggers and named triggers.
- Target object - The object to send the trigger to.
- Trigger name - Which action in the target’s Action Library to run, when the type is Named Trigger.
Other Fields
The Sprite Animation component provides a few controls outside of the Sprite Animation Tool.
Play on start
If checked, the clip shown in the drop-down will automatically start playing when the scene loads.
Rewind When Disabled
If checked, the animation will reset to the beginning when the game object is disabled.