The Keyframed Animation component allows a hierarchy of objects to be animated with keys and curves, similar to traditional animation packages. Keys representing motion are placed on a dope sheet (the Animation Editor) at various points in time and interpolated between during playback. The interpolation curves can also be edited (using the Curve Editor) to fine-tune the motion. Keyframed animation can be used for complex character hierarchies, and is particularly useful in conjunction with IK Solvers. Simple animations, such as movements from point A to B or fades in and out, are simpler to accomplish with the Animation component.
To create a keyframed animation, select the top object of the hierarchy you want to animate and choose Add > Keyframed Animation. Use the + button in the Keyframed Animation component inspector to add a new animation, select it in the list, and then click Edit Animation… to open it in the Animation Editor.
Keys are authored in the Animation Editor. The motion between keys is shaped in the Curve Editor.
The Animation Editor
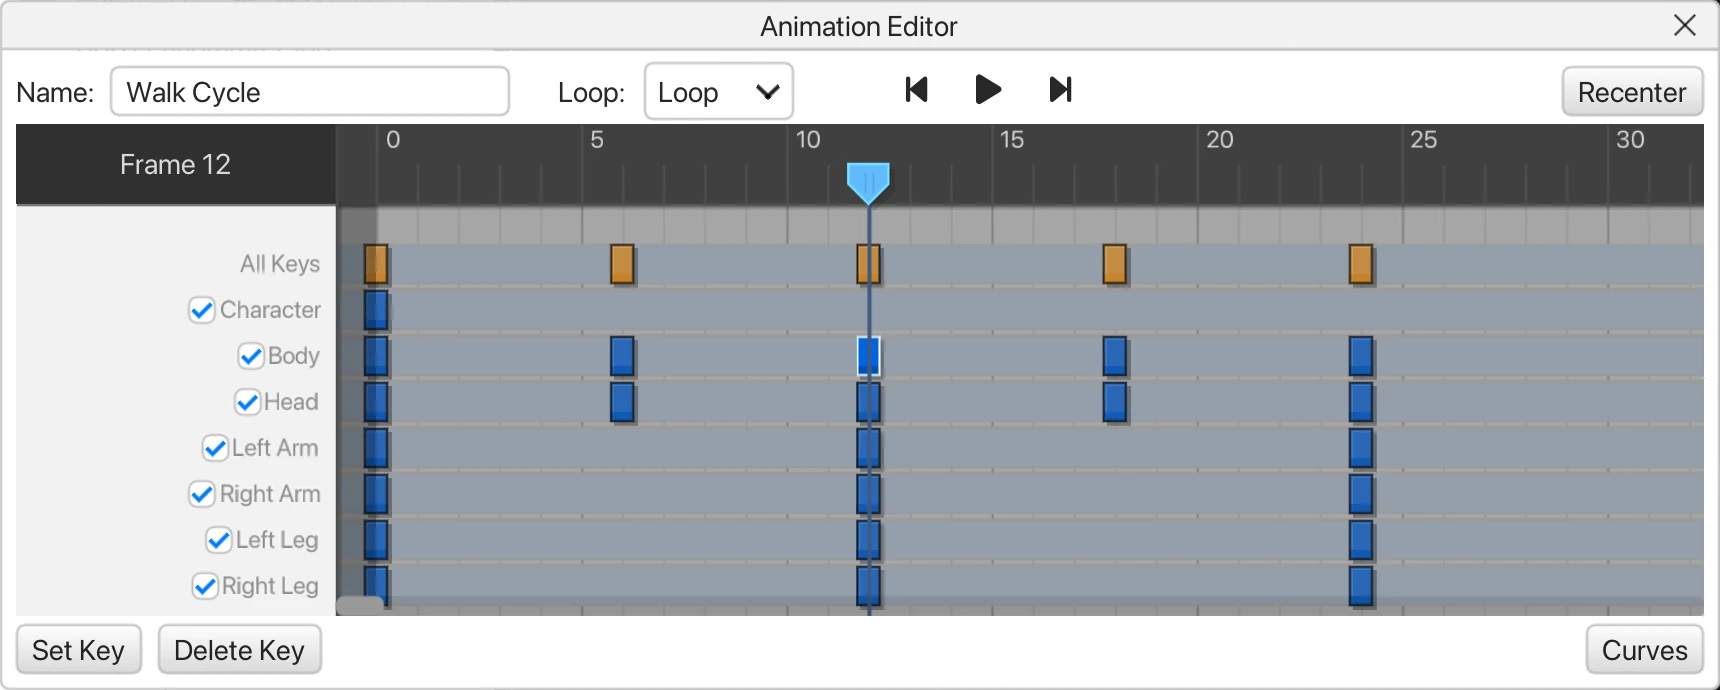
While an animation is open in this editor, the objects in the scene follow the playhead, so you can see the pose at any frame. Closing the editor restores the pose they had before.
The toolbar at the top contains:
- Name - The name of this animation.
- Loop - Whether the animation should loop, ping pong, or hold on the last frame.
- Previous Key, Play, Next Key - Jump to the nearest key in either direction, or play the animation.
- Recenter - Fit the whole animation in the timeline.
Tracks
The left side of the timeline lists one track for each object in the hierarchy. Unchecking a track’s checkbox will stop the animation from affecting that object. Clicking a track’s name makes it the current track, and double-clicking the name opens that track in the Curve Editor.
The All Keys row at the top allows all the keys for all objects at a particular frame to be selected as a group.
Keys
To record a key, move the playhead to the frame you want, select one or more objects in the scene, pose them, and click Set Key. A key is recorded for each selected object. Double-clicking an empty part of the timeline moves the playhead there and sets a key in the same way.
Keys can be dragged around on the timeline. Shift-clicking keys selects multiple, and right clicking or control-clicking allows keys to be copy and pasted.
The Curve Editor
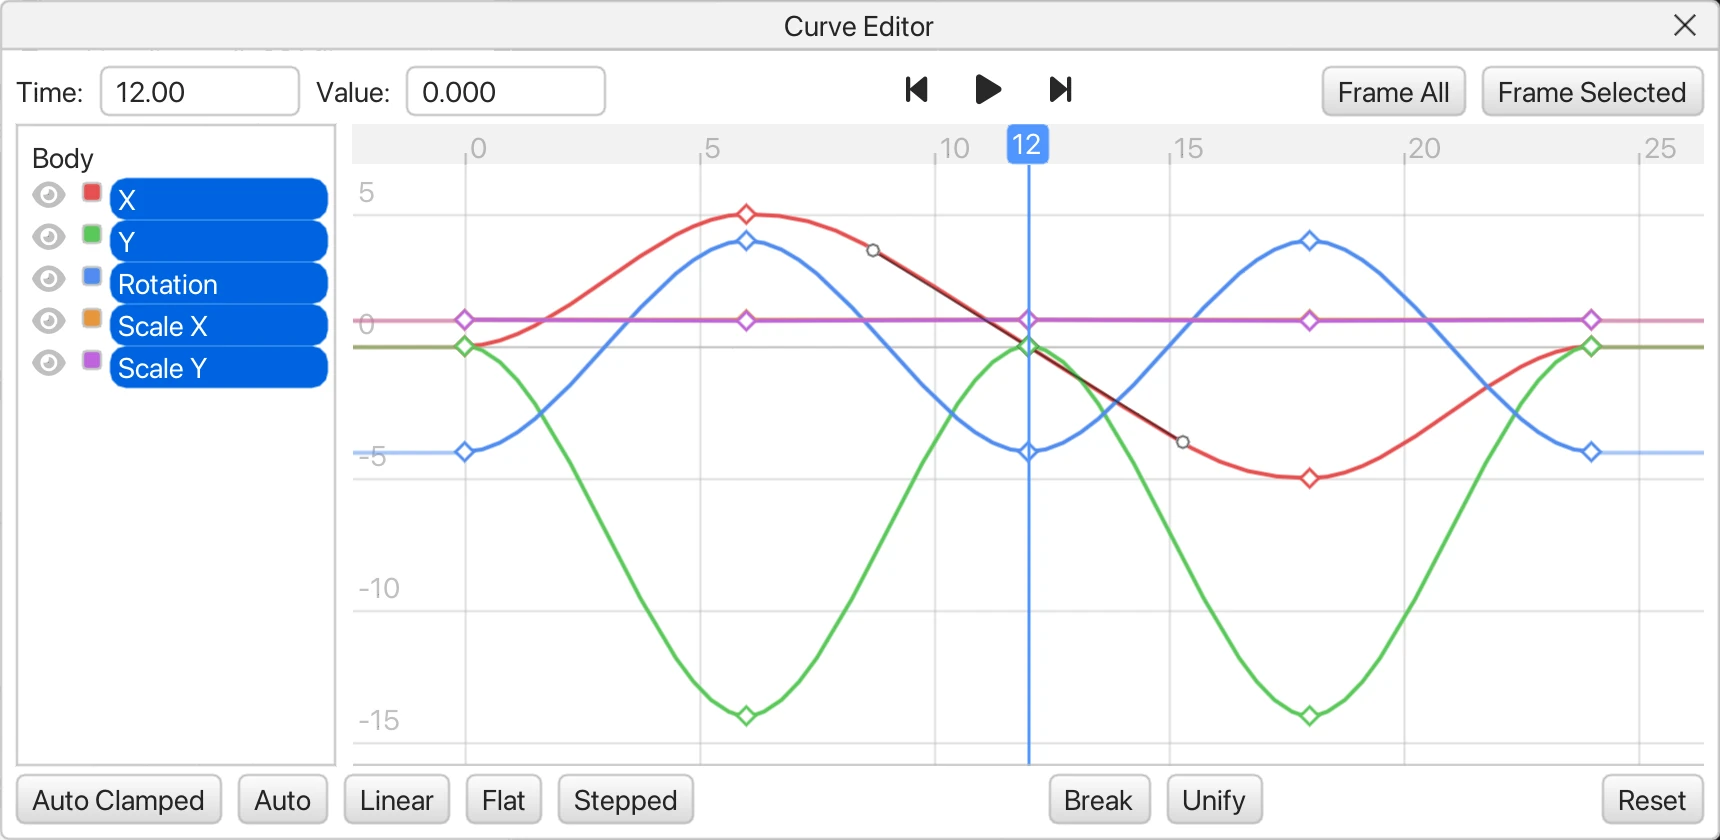
The Curve Editor allows interpolation curves to be edited across all the keys for a given track. Open it with the Curves button in the Animation Editor, by double-clicking a track name, or from the Window menu.
Axes
Each track contains several axes: X, Y, Rotation, Scale X, and Scale Y. Each has its own curve on the graph.
Only selected axes show their keys. Hide the axes you aren’t working on when values have very different ranges. For example, scale values near 1 look flat next to a position that moves hundreds of pixels.
Editing Keys
- Select - Click a key. Hold Shift to add to or toggle the selection, or Ctrl (Cmd on MacOS) to remove from it.
- Move - Drag a key to move its value or in time. Hold Shift to constrain the drag to horizontal or vertical movement. You can also type into the Time and Value fields at the top of the window, which show the first selected key.
- Insert - Press I to add a key at the playhead on the selected axes. Ctrl+right-click (Cmd-right-click on MacOS) adds a key under the pointer.
- Delete - Press Delete or Backspace.
- Reset - Restore this track’s curves to how they were when it was loaded into the editor.
Handles
A selected key shows handles that control the shape of the curve on each side of it.
Handles normally mirror each other to keep the curve smooth through the key. Break lets the two handles move independently so the curve can have a sharp corner. Unify joins them again by averaging their angles.
Tangent Types
The buttons at the bottom of the window set how the curve behaves around the selected keys:
- Auto Clamped - A smooth curve that never overshoots its keys. It flattens out at a key that is a high point or a low point.
- Auto - A smooth curve that aims from the previous key to the next. It can overshoot.
- Linear - A straight line to each neighboring key, for constant speed. This is the default for new keys.
- Flat - Handles are horizontal, so motion eases out of and into the key.
- Stepped - Holds this key’s value until the next key, then jumps.
Rotation
By default, keys set from the scene take the shortest way around (e.g. 0 to 300 rotates -60 degrees rather than 300 degrees). But the curve editor can also be used to unwrap rotations (e.g. so that a 0 .. 720 rotation makes two full spins). Drag the key’s value in the Curve Editor or type it into the Value field to produce rotations beyond 360 degrees.
Playing Animations
Use the Control Animation action to play animations. Playing a clip with a Fade Time cross-fades from whatever is currently playing. The Add and Remove commands fade one animation in or out on top of the others, so several can blend at once, and Queue Next Clip starts one when the current animation finishes.
Other Fields
Rewind When Disabled
If selected, the animation rewinds if its game object is disabled.
Frame Rate
The number of animation frames per second.
Animate When Disabled
If selected, the animation keeps playing while its game object is disabled. This takes priority over Rewind When Disabled.